Monday, 22 November 2010

On the Hobby Desk, A Night Off?

Hey, just a quick update today. Before I start, I know I said 1 Malifaux model a day, but the next day I started a new job, nights, which basically sapped me of any energy I would have directed at hobby. However, a night off has meant a sudden flurry of activity. The activity hasn't been very directed as you will see, but it’s something.

First of all, I was tired of having the awesome Leogante model by Andrea Miniatures sitting around without a base. So I decided I would find a base for it. This sounds simple I know, but trust me, a 54mm angel model if wings spread wide isn't exactly a well balanced model. I tried everything from 15mm to 60mm and no base I had would balance it out.

However, as luck would have it, my better half  and I went out to buy Pringles. Before anyone asks, yes the Pringles did help this is not a pointless ramble. I was just about to throw away the empty tube when I saw the metal base at the bottom. Inspiration struck and I quickly found myself sawing the bottom off the tube and grabbing some epoxy putty. Turns out the metal base of the Pringles tube makes an excellent base for unbalance 54mm models. Who knew!

Anyway, here are a few pictures, as you'll see the model is stunning and my next project after the Malifaux gang.

As I said, perfect! The model leans really far back and so need a massive base, which would cost the best part of £10 from a wargames supplier. However, this cost £1.99 for 3 metal bases and 3 plastic ones plus some useful tubes and yummy crispy snacks as a bonus. (Only at Morrisions buy one get two free!)


Second, I made a start on Captain Agemann. I've been planning a First Company Ultramarines army for a while. I commissioned this piece from an online sculptor/converter and think its a stunning piece. I've only made a rough start and he doesn't have a weapon right now as i can't decide what to use. I want a sword but can't decide what to have.

Option One; Classic Ultramarines gladius.
Option Two; A knight style longsword.
Option Three; Something totally different.

(I'll post a poll on this later.)

This picture really doesn't do the model justice. I'll get some more up when its done, but i have to say, some of the fine details on the armour are just stunning. The shoulder guards are covered by the wings of the Imperial Aquila, a large robe whips out behind him and the armour is just so perfectly ornate.

Please help finish this amazing model by voting on the weapon choice.

So, that’s about it, don't know what will be next what with work, but there should be something up soon.

As always, any comments or suggestions would be welcome.

Wednesday, 10 November 2010

MALIFAUX DEATH MARSHAL GANG PART ONE

Based in an alternate Earth, Malifaux uses gothic, steampunk, Victorian horror with a dose of the Wild West to inject fun and depth into the magical lawlessness of a world rife with monsters, necropunks, man-machine hybrids, gunslingers and power hungry politicos.

With a description like on the cover of the rulebook, who could resist having a look, I couldn't!

A little while ago I purchased a copy of the Malifaux rulebook along with some cool looking models and then, moved house. As you can guess, these really cool models suddenly went back in their really cool box and have stayed there since. However, as my hobby life is just about starting to thaw out, I thought I would use them as an excuse for some slow, character style painting.

I bought the Lady Justice boxed gang from firestorm games for £20. The box contained 5 figures, including 2 named characters, 5 DS style bases and gaming cards for each models. (In the game the cards provide a quick reference to the characters stats, no more flicking through codices!) In addition to this box set I also ordered one of the set of scenic bases produced for Malifaux.

So, here they are, assembled today, Lady Justice (Head of the death marshals) The Judge (Her second in command) and 3 death marshals.

As you can see, the models are stunning. Below are some more pictures of each model as well as a bit of character background for them.

LADY JUSTICE

Where exposure to the corruptive energies of necromancy has had an obvious effect on those that practise it, the techniques employed by the death marshals in destroying the art seem to have similar consequences. These ghoulish officers of the Guild are every bit as gruesome as the monsters they hunt. The magics they wield in hunting down Resurrectionists are eerily similar to those they condemn.

 
The blind Lady Justice seems somehow immune to this malignant energy, despite her recurring encounters with Resurrectionist dark arts. She is stoic and precise; few hear her words, but all see her decisive action. Her practical approach to her work is invested with the power that she will decide for herself what is just. Her effectiveness in this has given rise to her loft position within the Guild.


THE JUDGE

His lower face always hidden behind a bandana, the mysterious individual known only as The judge is both companion and Lieutenant to Lady Justice. Providing much needed counsel to her often irrational reactions to the obstacles they encounter, The Judge balances her impetuousness with his voice of reason.

With an almost intimate knowledge of the undead and their methodologies, The Judge helps Lady Justice guide the Guild's death marshals against the Resurrectionist threat. There is something inhuman in his dogged pursuit of necromantic practitioners, as if he prosecutes a personal vendetta against them that will never end while a single undead or their masters walk Malifaux.


THE DEATH MARSHALS

The Guild's special Death Marshal Department employs its namesake agents in open warfare against the Resurrectionist threat in Malifaux. Adhering to the tenet "know thine enemy", Death Marshals are trained in the dark arts of necromancy but forbidden its use. their bodies bear the cost of the knowledge; the wide-brimmed hat and high-collared worn as their uniforms disguise their wan appearance from outsiders, lest they terrify those they are sworn to protect.

The Death Marshal's preferred weapon is an enchanted coffin, which acts as a magical holding cell capable of inflicting horrific visions upon the prisoner while severing its link to Malifaux's magic.


So there we are, my new Malifaux gang made, based and ready for painting. Hopefully get some pictures up over the next few days as i get them done, hoping to get 1 model done a day for the rest of the week, so we shall see.

That’s all for now folks, if you like what you see or are interested in the idea of Malifaux, go to
www.wyrd-games.net (The are the guys to make the stuff but they are based in the US)
http://www.firestormgames.co.uk/malifaux (a huge range, and great discounts UK)

Friday, 5 November 2010

LOOTAZ! Oi boyz, we're missing something 'ere!

Greetings, this time I bring you my latest commission: a squad of five Orc Lootaz. Before we go any further let me say two things;
1. I have just moved house and no longer have access to the amazing camera of awesomeness,
2. I have made a massive mistake on these models (as in really big). See if you can spot it; I'll tell you at the end either way.

Anyway, disclaimer out of the way, back to cool models and the painting of them.

When I was asked to do these I was over the moon. I love painting orcs; it's the skin.

So, here they are in all their orcy glory.


The first to note on these is that I've moved away from my usual clean and crisp style. I felt lootaz needed a more ramshackle look to them and so used a technique now universally known as Jeff Rust, as detailed in the Book of Jeff. http://piratevikingpainting.blogspot.com/p/book-of-jeff.html (seriously good blog, suggest you check it out.)

After this, I batch painted in the base colours for the skin (orc hide shade), the red (red gore), and the yellow (bubonic brown). With these base colours on, I then finished up the red, gradually adding blood red to the red gore and finishing with a 50-50 Baal red and badab black wash. The yellow was simply a case of building up through bubonic brown to sun yellow, followed by a wash of griffin sepia. With the yellow on some of the glyfs, I used the same stippling effect as in Jeff Rust as I didn't think orcs would really spend the time building up their layers correctly (far too busy with the whole WAAAGH! thing).


Next I concentrated on all the little details such as the mek's bionic eye and the lightbulbs on the top of his kustom megablaster and the other little trinkets orcs like to carry around with them (teeth etc). I decided that the Mek's bionic eye and lightbulb along with pipes and feeds on weaponry would look better in bright colours to stand out from the Jeff Rust effect. Plus, I figured Lootaz being bigger and stronger than a lot of boyz would nab all the spanky piping for themselves.


As you can see, the bright colours really contrast well with the dingy effect of the weapon itself.

Finally, I got to start on the bit that I'd been really looking forward to; the skin. For many people, orc skin is a simple case of knarloc green and a badab black wash. And if you want a realistic grubby-looking bugger, that's ideal. However, I prefer a far more high fantasy approach. When I paint orc skin, I paint what can only be described as the incredible hulk of orc skins.

The process outlined below is a long one, and one that I don't suggest anyone embarks upon unless they have a) a lot of spare time, and b) want to end their project utterly insane.

Base coat - orc hide shade
Step 1 - Knarloc green on raised muscle area
Step 2 - thrakka green wash
Step 3 - repeat knarloc green on all raised muscle areas
Step 4 - highlight raised muscle areas in knarloc green and goblin green mix 4:1
Step 5 - highlight raised muscle areas in knarloc green and goblin green mix 3:2
Step 6 - highlight raised muscle areas in knarloc green and goblin green mix 1:1
Step 7 - highlight raised muscle areas in knarloc green and goblin green mix 2:3
Step 8 - highlight raised muscle areas in knarloc green and goblin green mix 1:4
Step 9 - highlight raised muscle areas in pure goblin green
Step 10 - highlight raised muscle areas in goblin green and rotting flesh 4:1
Step 11 - highlight raised muscle areas in goblin green and rotting flesh  3:2
Step 12 - highlight raised muscle areas in goblin green and rotting flesh  1:1
Step 13 - highlight raised muscle areas in goblin green and rotting flesh  2:3
Step 14 - highlight raised muscle areas in goblin green and rotting flesh  1:4
Step 15 - highlight raised muscle areas in pure rotting flesh
Step 16 - Trakka green wash over all skin areas.

As you can see in the images, this gives a very bright and vibrant tone to the skin and while this suits the way in which I see orcs, as a somewhat comical race, other people would argue that their war-like barbarity inspires a darker palette.

Anyway, that's about it for this job. Have you guessed what it is yet?


THE TEETH.

Couldn't believe it when I was looking at the pictures and suddenly realised I'd completely neglected to paint the teeth.

Before I go, here are a few more images of the finished product.


That's about it for this post. As always, comments and criticisms are welcome.

The Longbeard

Tuesday, 19 October 2010

Greetings and a new librarian

Hello and welcome to the brand new and shiny Longbeard Painting and Modelling Blog!
Here I will be posting blogs as regularly as I can to keep you up to date on my current projects. There will be a mix of things I do for ongoing projects, models I paint because they are new, shiny or awesome and the odd model painted for someone else.

In this, the first ever post, I thought I would share a model I have been working on recently. It not quite done yet, but is well on the way to being a nice gaming piece.

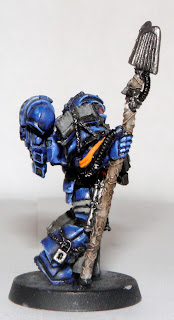
This is Librarian Reas Imarion, Guardian of the Hall of Fire and First Seer of the Sacred Flame. Reas is the head Librarian in my spacemarine chapter, The Keepers of the Flame (more on them later).

As you can see he is a long way from done. The face has only just been started, his robes need neatening up and his book is empty. Not to mention his staff needing a good few more layers and the base needing, well, everything!

I am however; I am very pleased with the way he is going. There are several things i like about him. The first is the great model. This is by far one of my favourite GW models at the moment. I love the small but simple movement of it, the idea of him striding through battle unconcerned with the death and carnage that surrounds him, totally focused on his goal.

The Keepers of the flame do not favour ornamentation and as such, I chose to use a fairly small earthy pallet. I am particularly pleased with the robes. They are painting using Charadon Granite as a base coat. This is then mixed gradually with increasing parts of Kommando Khaki. This gives a really plain looking robe, as if it has simply never been dyed. It looks almost like a simply hessian material, which is exactly what the chapter would wear.

I am also pleased with the blue. This was an unusual one for me, as the chapters main armour colour is orange. I decided I wanted the blue of the Librarium to be a bit different to say the blue of the ultramarines or eagle warriors. I wanted it to stand out in the crowd of blue marines. For this reason, I decided I would highlight it to white. This is by far my favourite way to paint blue armour. The painting steps are given below along with a few more pictures.
Base Coat: Mordian Blue
Stage One: Mordian Blue + Ultramarine Blue 2:1
Stage Two: Mordian Blue + Ultramarine Blue 1:1
Stage Three: Mordian Blue + Ultramarine Blue 1:2
Stage Four: Ultramarine Blue
Stage Five: Ultramarine Blue + Enchanted Blue 3:1
Stage Six: Ultramarine Blue + Enchanted Blue 2:1
Stage Seven: Ultramarine Blue + Enchanted Blue 1:1
Stage Eight: 'Stage Seven' + Skull White 4:1
Stage Nine: 'Stage Eight' + Skull White 3:1
Stage Ten: 'Stage Nine' + Skull White 2:1
Stage Eleven: 'Stage Ten' + Skull White 1:1
Stage Twelve: 'Stage Eleven' + Skull White 0.5:1
Stage Thirteen: Skull White
Stage Fourteen: Asuremen Blue Wash
Stage Fifteen: Repeat steps Seven to Thirteen


 Anyway, that’s about all for now. Please comment on what you think any improvements you would suggest? Hopefully i will have some new exciting stuff to put up soon.

Thanks

Tom
(The Longbeard)